Other Product Functionality
How to Create a Variant Group in Merchant Center
Variant groups let you group products with different options (for example material or color). Follow these steps to create and manage a variant group.
Key features
- Group products with different options (size, material, color) into a variant group
- Add all desired dimensions when creating the group (you can't add more later)
- Control the group key and whether the group is collapsed in lists
Quick guide
- Open the product, click the Variants tab, and select Create Variant Group.
- Choose the dimensions (for example size, material) and click Add.
- Click Create, add other products, and assign dimension values.
- Click Save.
Create a variant group
- Open the product you want to create a variant group for. Click the Variants tab and select Create Variant Group.
- Select the dimensions you want (for example size, material) from the dropdown and click Add.
- Add all desired dimensions at this step. You can't add dimensions to an existing group, you would have to remove the products and create a new group.
- Click Create to set up the group. The current product is added automatically.
- Add more products by searching for their name or ID in the Add Product field, and assign values for the selected dimensions to each product.
- Click Save to finalize the group.
Example of a variant group in Merchant Center:
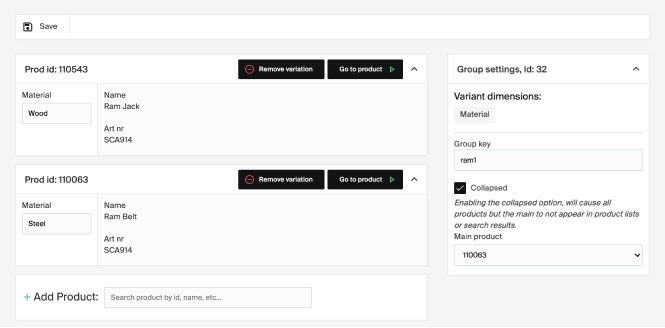
Group settings
Under Group Settings you'll find Group Key and Collapsed State.
Group Key
- A unique identifier for the group (text or numbers). Products with the same key belong to the same variant group.
- A product can only belong to one group. Adding a different key via import removes the product from its current group.
Collapsed State
- If enabled, only the Main Product appears in product lists and search results. Other products in the group aren't displayed.